1s 8.3 structure to table of values
In order to account for money and goods, various tables are widely used in business. Almost every document is a table.
One table lists the goods to be shipped from the warehouse. Another table shows the obligations to pay for these goods.
Therefore, in 1C, working with tables occupies a prominent place.
Tables in 1C are also called “tabular parts”. Directories, documents and others have them.
The query, when executed, returns a table that can be accessed in two different ways.
The first - faster - selection, obtaining rows from it is possible only in order. The second is uploading the query result into a table of values and then random access to it.
//Option 1 – sequential access to query results
//get the table
Select = Query.Run().Select();
// we go through all the lines of the query result in order
While Select.Next() Loop
Report(Selection.Name);
EndCycle;
//Option 2 – uploading to a table of values
Request = New Request("SELECT Name FROM Directory.Nomenclature");
//get the table
Table = Query.Run().Unload().
//further we can also traverse all lines
For each Row from Table Cycle
Report(String.Name);
EndCycle;
//or arbitrarily access strings
Row = Table.Find("Shovel", "Name");
An important feature is that in the table that is obtained from the query result, all columns will be strictly typed. This means that by requesting the Name field from the Nomenclature directory, you will receive a column of the String type with an allowable length of no more than N characters.
Table on the form (thick client)
The user works with the table when it is placed on the form.
We discussed the basic principles of working with forms in the lesson on and in the lesson on
So, let's place the table on the form. To do this, you can drag the table from the Controls panel. Similarly, you can select Form/Insert Control from the menu.


The data can be stored in the configuration - then you need to select the existing (previously added) tabular part of the configuration object whose form you are editing.
Click the "..." button in the Data property. In order to see the list of tabular parts, you need to expand the Object branch.
When you select the tabular part, 1C itself will add columns to the table on the form. Rows entered by the user into such a table will be saved automatically along with the reference book/document.

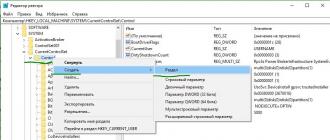
In the same Data property, you can enter an arbitrary name and select the Value Table type.
This means that an arbitrary table of values has been selected. It will not automatically add columns, nor will it be automatically saved, but you can do whatever you want with it.
By right-clicking on the table you can add a column. In the properties of a column, you can specify its name (for reference in 1C code), the column heading on the form, the connection with the attribute of the tabular part (the latter - if not an arbitrary table is selected, but a tabular part).

In the table properties on the form, you can specify whether the user can add/delete rows. A more advanced form is the View Only checkbox. These properties are convenient to use for organizing tables intended for displaying information, but not editing.

To manage the table, you need to display a command panel on the form. Select the menu item Form/Insert Control/Command Bar.

In the command bar properties, select the Autofill checkbox so that the buttons on the panel appear automatically.

Table on form (thin/managed client)
On a managed form, these actions look a little different. If you need to place a tabular part on the form, expand the Object branch and drag one of the tabular parts to the left. That's all!

If you need to place a table of values, add a new form attribute and in its properties specify the type – table of values.

To add columns, use the right-click menu on this form attribute, select Add attribute column.

Then also drag the table to the left.

In order for a table to have a command bar, in the table properties, select the values in the Usage – Command bar position section.

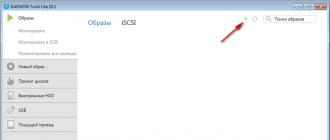
Uploading a table to Excel
Any 1C table located on the form can be printed or uploaded to Excel.
To do this, right-click on an empty space in the table and select List.

In a managed (thin) client, similar actions can be performed using the menu item All actions/Display list.

Greetings to all readers of infostart. This article will be devoted to the issue of creating an arbitrary table of values on the form of a managed application programmatically.
Features of the task.
Anyone who has programmed in a regular application has often been faced with the task of obtaining an arbitrary table of values on a form. An arbitrary table of values is a table whose number and type of columns are not known in advance. That is, there could be 3 columns, or maybe 6, or maybe 8. In a normal application, everything is simple: you could place the “Table of Values” element on the processing form, and then transfer the created table of values to this element programmatically. Then with a simple command:
Form Elements.TableField.CreateColumns();
get a ready-made table of values on the form. It would seem that it could be simpler.
This was all in the regular application. In a managed application, everything has changed. It’s not that easy to create an arbitrary table. Now you need to either rigidly parameterize the table of values on the form, or create it programmatically (describe, well, this, in fact, is the essence of the managed application itself). This is what we will try to do: programmatically create an arbitrary table of values on a controlled form.
The solution of the problem.
The first thing we need to do is determine how the table will appear on the form. The main thing is that you don’t need to create any form element in processing. We will create it programmatically, like the entire table. That is, the table will be described and created at the moment the form is opened or using a button - depending on who needs it.
The creation of a table on the form occurs through the description of the value table as an attribute:
SelectionTypeArray = New Array; Array of SelectionType.Add(Type("Value Table")); ChoiceTypeDescription = New TypeDescription(ChoiceTypeArray); Array of Details = New Array; Array of Attributes.Add(New Form Attributes("Schedule Table", Description of SelectionType, "", "TZN")); Now we have to create a program value table that contains the data. If the table of values is obtained from a query, then everything is more or less in order. If the table is created manually, then the meaning of the columns that will contain numbers or dates can be created through the “Description of Types”. The point is that the columns in the table of values must have some type. If, for example, it is expected that the user will fill in the data in these columns interactively, then you cannot add a value table column simply with a name; it must have a type. Keep in mind - this is very important because... We will transfer these types to the table on the form.
We create a table that contains several columns:
CD = NewDateQualifiers(DateParts.Time); ArrayKD = New Array; ArrayCD.Add(Type("Date")); DescriptionTypesTime = New DescriptionTypes(ArrayCD,CD); TZ = New ValueTable;
TK.Columns.Add("With", DescriptionTypesTime);
TK.Columns.Add("Before", DescriptionTypesTime);
TK.Columns.Add("Name");
TK.Columns.Add("Note"); // Full name and Note - rows Next, we will fill our TK program table with the necessary data. We get a TK table that contains the necessary values and is ready to be transferred to the created form attribute. For Each Column From TK. Columns Cycle
Array of Attributes.Add(New Form Attributes(Column.Name, Column.ValueType,"ScheduleTable"));EndCycle;
ChangeDetails(ArrayDetails);
SelectionFieldsTable = Elements.Add("TZN", Type("FormTable"));
SelectionFieldsTable.DataPath = "ScheduleTable";
SelectionFieldTable.Display = TableDisplay.List;
This is a simple combination and our table is ready.
For Each Column From TK. Columns Cycle
NewElement = Elements.Add(Column.Name, Type("FormField"), SelectionFieldTable);EndCycle;
NewElement.View = FormFieldView.InputField;
NewElement.DataPath = "ScheduleTable." + Column.Name;
NewElement.Width = 10;
Conditional design, if we need it, we also write it manually, the command menu - manually. Table handlers are also written by hand. For example, to add an event handler for the “Selection” table:
Table of SelectionFields.SetAction("Selection","TZNSelection");
To process this event, a separate procedure is prescribed in the form of a procedure:
&OnClient
Procedure TKNSelection(TK, SelectedRow, Field, StandardProcessing)
//handler commands EndProcedure
Note that table handlers fire on the client and therefore must have a compiler pointer command
&OnClient
Well, the last thing I wanted to add is that after all these steps, be sure to remember to pass the finished table to the form attribute:
ValueВFormAttributes(ToR, "ScheduleTable");
This is what we have as a result:

And here is the handling of the "Selection" event:

Afterword.
I hope the article will help those 1C programmers who are starting to create tables on a form programmatically.
You can download a processing that programmatically creates a table of values and displays it on a manageable form with comments that will help you create your own tables.
Here's a little fact for starters - simple examples of working with a table of values:
1. Create a table of values
ValueTable = New ValueTable;
2. Create columns for the table of values:
ValueTable.Columns.Add("Name");
Value Table.Columns.Add("Last Name");
3. Add new rows using column names:
NewLine.Name = "Vasily";
NewLine.LastName = "Pupkin";
4. How to look up a value in the value table:
It is necessary to find a table row containing the desired value.
FoundRow = ValueTable.Find(SearchValue);
5. Find the first occurrence in certain columns of the table of values
FoundRow = ValueTable.Find(SearchValue, "Supplier, Buyer");
6. If you need to find all occurrences in the table of values:
We use the search structure.
SearchStructure = Structure("Employee", SearchValue);
Array of FoundRows = ValueTable.FindRows(SearchStructure);
Let's create a search structure, each element of which will contain the name of the column as a key and the desired value in this column as a value. We pass the Search Structure as a parameter to the FindLines() method. As a result, we get table rows.
If you add a search for the desired value to the search structure, for example, also in the Responsible column, then as a result of applying the FindLines() method we will get all rows where both the Employee and the Responsible are equal to the searched value.
7. How to iterate through a table of values in random order
For Each Current Row From Table Of Values Loop
Report(CurrentRow.Name);
EndCycle;
Same thing using indexes:
SeniorIndex = ValueTable.Quantity() - 1;
For Account = 0 to SeniorIndex Cycle
Report(ValueTable[Account].Name);
EndCycle;
8. Deleting an existing value table row
ValueTable.Delete(Row to be deleted);
by index
ValueTable.Delete(0);
9. Deleting an existing column of the value table
ValueTable.Columns.Delete(ColumnToDelete);
by index
ValueTable.Columns.Delete(0);
It is necessary to take into account that deleting a row (or column) “from the middle” of the table of values will lead to a decrease by one indices of the rows located “after” the deleted
10. How to fill a table of values if the column names are contained in variables?
NewRow = ValueTable.Add();
NewRow[ColumnName] = Value;
11. How to fill the entire column of the value table with the desired value?
The Fiscal Accounting Flag column in the Table of Values table of values must be filled in with the value False
Table of Values. Fill in Values (False, "Fiscal Accounting Flag");
We use the FillValues() method for the value table. The first parameter is the value to be filled. The second parameter is the name of the column to be filled.
12. How to fill the value table “Receiver Table” with data from the value table “SourceTable”?
If the Recipient Table does not yet exist at the time of the operation or its previous columns do not need to be saved, you can create it as a complete copy of the original
Recipient table = Source table.Copy();
Option two: the ReceiverTable table exists, and it would be a pity to lose its columns and restrictions on the column data types. But you need to fill in the data for the columns whose names match the names of the source table.
Partial data transfer for columns with matching names:
For Each Row of the SourceTable From the SourceTable Cycle
FillPropertyValues(NewRow, SourceTableRow);
End of the Cycle
For each row of the source table, a new row is added to the receiving table and the values are filled in those columns of the new table whose names match the names of the columns in the source table
If the tables do not have columns with the same names, the destination table will end up containing as many rows with null values as there were rows in the source table.
If for some columns of the same name the data value type from the source table does not fall into the array of allowed column types of the destination table, we will get empty values in such fields.
Let's consider the third case. In the case of columns of the same name, the column of the destination table must be brought into full compliance with the column of the source table.
Full copying of data for columns with matching names
Same Columns = New Array();
For Each Column From SourceTable.Columns Cycle
MatchingColumn = TableReceiver.Columns.Find(Column.Name);
If Matching Column<>Undefined Then
// Get column properties.
Name = Column.Name;
ValueType = Column.ValueType;
Header = Column.Header;
Width = Column.Width;
// Replace columns in the destination table.
Index = TableReceiver.Columns.Index(MatchingColumn);
TableReceiver.Columns.Delete(Index);
ReceiverTable.Columns.Insert(Index, Name, ValueType, Header, Width);
// Add the next name of matching columns to the array.
Same Columns.Add(Column.Name);
endIf;
EndCycle;
// Cycle through the rows of the source table.
For each Row of the SourceTable from the SourceTable cycle
// Add a new row to the destination table.
NewRow = TableReceiver.Add();
// Fill in the values in the matching cells.
For each Name Columns From Columns of the same name Cycle
NewRow[ColumnName] = SourceTableRow[ColumnName];
EndCycle;
EndCycle;
We will have to replace the column in the destination table with a new one, whose properties will fully match the column of the source table.
Therefore, if a column of the same name is found in the recipient table, we collect all the properties for the new column in variables. Next, delete the old one and create a new column. Then we loop through the rows of the source table.
In the loop, we add a new row to the receiving table and open a loop over the column names in the array of matching columns.
Inside this nested loop, we fill the cells of the destination table with the data of the source table cell.
13. How to add columns to the “ValueTable” table of values with type restrictions?
When adding a column, you can simply specify its name and leave the second parameter of the Add() method untouched. In this case, the column data type is arbitrary.
Adding a column without specifying a data type
// Add a column without restrictions on type.
ValueTable.Columns.Add("Object");
You can fill in the value of the second parameter. There you need to pass a description of the type allowed for the column. The description itself can be obtained using the constructor by passing the string name of the type (if there are many types, separated by commas) or an array of valid types as a parameter.
Adding a column indicating the data type
// Restrictions on column data types:
// Only elements of the "Counterparties" directory.
Table of Values.Columns.Add("Account", New Description of Types("DirectoryLink.Accounts"));
If among the types allowed for filling column data there is a string, you can limit its bit depth (length), specify the use of a variable or fixed length. All this is achieved by creating an object using the String Qualifiers constructor. Next, this object will be used as one of the parameters of the TypeDescription constructor.
Using qualifiers to specify the data type of a value table column
// Prepare and set restrictions for data of the String type.
String Qualifiers = New String Qualifiers(20, AllowedLength.Variable);
ValidTypes = NewTypeDescription("String", StringQualifiers);
ValueTable.Columns.Add("NoteStringShort", ValidTypes);
Similar actions can be performed with respect to number and date qualifiers.
Please note: type descriptions can be built by the constructor either “from scratch” or an existing type description can be used as a basis.
Using existing type declarations to specify the data type of a value table column
// Extension of the previously used type description.
QualifiersNumbers = New QualifiersNumbers(10, 2, ValidSign.Non-negative);
DateQualifiers = New DateQualifiers(DateParts.Date);
Extended ValidTypes = New TypeDescription(ValidTypes, "Number, Date", Number Qualifiers, Date Qualifiers);
ValueTable.Columns.Add("Note", ExtendedAcceptableTypes);
There are two special methods for searching a table of values:
1. Find
TVHorizon = Directories.Nomenclature.FindByName("TVHorizon");FoundString = TZNomenclature.Find(TVHorizon);
//we can also specify which columns to search in to speed up the search
FoundString = TZNomenclature.Find(TVHorizon, "Nomenclature");
This method returns the first row found with the desired value, or Undefined if it does not find it. Therefore, it is convenient to use it to search for unique values, because otherwise, when you find a value, you will have to remove it from the table in order to find the next one.
To avoid this hassle, there is the following method that allows you to find an array of matching strings:
2. FindStrings
Selection Structure.Insert("Nomenclature", TVHorizon); // first indicate the column where to look, and then what to look for.
This method always returns an array, but it can be empty if nothing is found. And this method, like the previous one, returns the rows of the table of values themselves, and not the values themselves in a separate array. Therefore, by changing the values in the array string or, as in the previous method, for the found string, you will change the value in the processed table of values.
Another good thing about this method is that it can search through several columns of the value table at once:
SelectionStructure = New Structure;
Selection Structure.Insert("Nomenclature", TVHorizon);
Selection Structure.Insert("Quantity", 10);
FoundArray of Rows = TZNomenclature.FindLines(SelectionStructure);
The only negative, as you can see, is that you cannot use other types of comparison other than “equals”