Boot disk with several operating systems. Creating a multiboot flash drive with Windows operating systems. Creating a multiboot USB drive using the WinSetupFromUSB utility Do-it-yourself bootable flash drive
But what to do if you have several computers or laptops at home with different operating systems installed. Or friends often ask you to reinstall Windows or install a new version of it. Of course, you can create a bootable USB flash drive every time. You can also buy several flash drives and install various programs on them. But it is much easier to choose this option - creating a multiboot flash drive with different versions of Windows and utilities. This will be discussed in this article.
What you need
So, what do you need for this? Of course, you must have all the necessary ISO images that you want to burn onto it: various operating systems and utilities. This could be Windows XP, 7, 8 and others; Dr.Web LiveCD or Kaspersky Rescue Disk – for checking your computer for viruses, Victoria – for fixing hard drive errors, Acronis Disk Director – for dividing your hard drive into partitions and others. You can download them from the Internet, or make images from disks, you can read about this by following the link.
We will also need a special program with which we will create a multiboot flash drive, and, of course, the USB drive itself. Choose its volume based on what you will be recording. If this is a set of different programs, 1-4 GB will be enough. If you want to make a multiboot flash drive with multiple OSes and add programs to it, take a flash drive with a memory capacity of 8 GB or more.
As an example, in this article we will make a multiboot flash drive with Windows 8 and the Victoria program. I took a 4 GB flash drive. We will use the free program WinSetupFromUSB.
Downloading the required utility
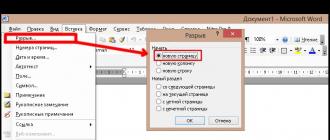
You can download the program from the official website. Write “WinSetupFromUSB” in the search engine and follow the link shown in the figure below.
We will download the latest version of the program at the time of writing. Follow the appropriate link.

Click on the blue “Download” button.

Formatting a flash drive
The next thing we will do is format the flash drive using standard Windows tools, which will be bootable. Copy the necessary files from it, as all information from the device will be completely deleted.
Insert it into your computer or laptop, and you need to use a USB 2.0 port. Go to “Computer”, right-click on it and select from the context menu "Format".


An information window will appear informing you that all data will be destroyed, click OK.

When the USB drive is formatted, a corresponding window will open. Click “OK” in it and close the format utility.

Operating system entry
Unpack the downloaded archive with the WinSetupFromUSB program and run the file “WinSetupFromUSB_1-6”.

First of all, let’s write an image with the Windows 8 operating system onto our multiboot flash drive.
In the program window, in the section, select the flash drive that we formatted. In the “Add to USB disk” section, check the box "Windows Vista/7/8/10/Server 2008/2012 based ISO"

An Explorer window will open. Find the desired image on your computer, in the example this is the image of the Windows 8 operating system, and click “Open”.

Click "GO".

After the process is completely completed, the “Job done” window will appear.

I only have a 4 GB flash drive, so I won’t be able to write many operating systems onto it. If you need to add Windows Vista, 7, 10 to a multiboot flash drive, repeat all the steps described above. To add Windows XP, in the “Add to USB disk” section, check the box "Windows 2000/XP/2003 Setup". Each time, select the same flash drive on which you recorded images earlier.
Recording programs
Now let's add a program to the multiboot flash drive to check and fix Victoria hard drive errors.
Run WinSetupFromUSB and in the section "USB disk selection and format tools" select our flash drive. Next, in the “Add to USB disk” section, put a tick in the box "Linux ISO/Other Grub4dos compatible ISO" and click on the button with three dots.

Through Explorer, find the program image on your computer and click Open. Then an information window will appear, click “OK” in it, or it will disappear itself after 10 seconds.

Click “GO” and wait for the program to be written to the flash drive.

To add other programs you need to the multiboot flash drive, repeat all the steps described above. Select the desired utility image each time.
Examination
After you add all the images of operating systems and programs to the flash drive, let's look at the result - open the boot menu of the flash drive in the QEMU virtual machine.
To do this, in the program window, click on the “Refresh” button, then check the “Test in QEMU” box and click “GO”.
You can see what the boot menu looks like after each addition of an OS or program to the flash drive.

In the example, the boot menu of the flash drive looks like this. The USB flash drive contains Windows 8 OS and the Victoria program. You will see a different list depending on what you upload to it.

To create a bootable flash drive, we will use programs from both a third-party manufacturer and the built-in Windows command interpreter. Each method is different and has its own specifics, but I think that a simple end user will be able to cope with creating a bootable flash drive using any of the proposed methods:
- how to make a bootable USB flash drive using the command line
- how to make a bootable USB flash drive using UltraISO
- how to make a bootable USB flash drive using Windows7 USB/DVD Download Tool
If you are interested in information about creating a bootable USB flash drive for the Linux operating system family, then you can read the information at this link “bootable USB flash drive for Linux”.
So, I propose to start creating a bootable flash drive in order, as defined in the above list, accordingly we proceed to the first method.
BOOT FLASH DRIVE using the command line (method I)
Next, we will use only those commands that we need when creating a bootable flash drive. Therefore, the figure below shows the sequential entry of commands to create a bootable USB flash drive. And please pay attention to the fact that the commands you enter are indicated by a red underline!
Graphical representation of command input on the command line
Now let's describe the previously entered commands:
DISKPART- launch the program, a text-mode command interpreter that allows you to manage objects (disks, partitions or volumes) using scripts or directly entering commands from the command line.
list disk- display a list of disk drives connected to a personal computer.
select disk 1- select disk number “1”, since in our case it is a removable flash drive.
clean- clears all data from removable media - flash drive.
create partition primary- create a primary partition.
select partition 1- select the created section.
active- make the section active.
format fs=NTFS- format the flash drive in the NTFS file system.
assign letter=T- if necessary, you can assign a letter for the flash drive in this way.
Exit- exit the DISKPART program.
BOOTABLE FLASH DRIVE CREATED!
NOTE: Once you have created a bootable USB flash drive, you need to transfer the operating system files to this removable media. Files must be transferred in unpacked form, do not under any circumstances simply add an operating system image, for example one *.ISO file, it WILL NOT WORK!!!
You can see the complete list of Diskpart program commands in the following table:
Table of commands of the "DISKPART" program
| TEAM | EXPLANATION |
| ACTIVE | - Mark the selected section as active. |
| ADD | - Adding a mirror to a simple volume. |
| ASSIGN | - Assign a name or mount point to the selected volume. |
| ATTRIBUTES | - Working with volume or disk attributes. |
| ATTACH | - Attaches a virtual disk file. |
| AUTOMOUNT | - Enable or disable automatic mounting of basic volumes. |
| BREAK | - Splitting the mirror set. |
| CLEAN | - Clear configuration information or all data on the disk. |
| COMPACT | - Attempts to reduce the physical size of the file. |
| CONVERT | - Convert disk formats. |
| CREATE | - Create a volume, partition or virtual disk. |
| DELETE | - Delete an object. |
| DETAIL | - View object parameters. |
| DETACH | - Detaches the virtual disk file. |
| EXIT | - Shutdown DiskPart. |
| EXTEND | - Expand volume. |
| EXPAND | - Increasing the maximum available space on the virtual disk. |
| FILESYSTEMS | - Displays the current and supported file systems for the volume. |
| FORMAT | - Formatting a given volume or partition. |
| GPT | - Assigning attributes to the selected GPT partition. |
| HELP | - Display a list of commands. |
| IMPORT | - Import a disk group. |
| INACTIVE | - Marking the selected section as inactive. |
| LIST | - Display a list of objects. |
| MERGE | - Merging a child disk with its parents. |
| ONLINE | - Transferring an object marked as "offline" to the "online" state. |
| OFFLINE | - Transferring an object marked as “online” to the “offline” state. |
| RECOVER | - Update the status of all disks of the selected package. Attempting to rebuild disks of the wrong package and resynchronizing mirrored and RAID5 volumes with outdated plex or parity data. |
| R.E.M. | - Does not perform any actions. Used to comment scripts. |
| REMOVE | - Deleting a drive name or mount point. |
| REPAIR | - Recovering a RAID-5 volume with a failed member. |
| RESCAN | - Search for disks and volumes on your computer. |
| RETAIN | - Placing a service partition on a simple volume. |
| SAN | - Display or set the SAN policy for the currently loaded OS. |
| SELECT | - Setting focus on an object. |
| SETID | - Changing the partition type. |
| SHRINK | - Reduce the size of the selected volume. |
| UNIQUEID | - Display or set the GUID Partition Table (GPT) code or Master Boot Record (MBR) signature of the disk. |
BOOT FLASH DRIVE using the UltraISO program (II method)
The UltraISO program is designed for creating and editing disk images. When creating a bootable flash drive, we will use the built-in functions of this program.
Open the program with administrator rights, as shown in the figure:


Select the required operating system image to create a bootable USB flash drive, for example, the Windows Vista disk image is selected here:


A pop-up window appears where you need to make sure that the removable media, the image file to be recorded and the recording method are correctly specified (it must be set in USB-HDD+ mode) and click the “burn” button

After clicking the "Write" button, a "Hint" window will appear, prompting you to erase all information on the flash drive. Agree!

Then the data will be written to the flash drive...

And finally, after a certain time, the operating system image will be written to a newly created bootable USB flash drive for future installation.

BOOTABLE FLASH DRIVE IS MADE!
NOTE: Do not forget to set the BIOS input/output system to boot the primary device, that is, make sure that the computer boots from removable media - the bootable flash drive you created.
BOOT FLASH DRIVE using Windows7 USB/DVD Download Tool (III method)
The Windows7 USB/DVD Download Tool program created by Microsoft for burning operating system disk images to optical and removable media. When creating a bootable flash drive, we will sequentially follow all the instructions of the program.
First, you need to download this program from the official Microsoft website. Then you need to install the program following the installer's instructions. After installing the program, a shortcut will appear on the desktop, as shown in the figure:
Run it with "Administrator rights", right-click on the shortcut and click on the line "Run as administrator". The program will start, click the "Browse" button and select the operating system image *.ISO

After you have selected the image of the system to be recorded, click “Next”, another window will appear where you will be asked to select the type of media - optical or removable. Since we have a removable storage device - a flash drive, select "USB device"

We select our removable media from the proposed list, i.e. flash drive and press the "Begin copying" button

After clicking the above button, the process of formatting the flash drive will begin...

After some time, the process of writing the disk image data to the flash drive will continue.

We wait some time for the image to be recorded, and eventually we will get 100%, and here we are The bootable flash drive is created!
NOTE: Do not forget to set the BIOS input/output system to boot the primary device, that is, make sure that the computer boots from removable media - the bootable flash drive you created.
And others.
So far I have not been able to add an antivirus or to scan my computer for viruses. From this multiboot flash drive, you can install only one version of Windows 7 and Windows XP recorded on it. That is, I don’t yet know how to make sure that there are several images of Windows 7 on a flash drive so that we can choose during installation. (If you have several operating systems in the image for installation, in this case there will be a choice. Read and see how to make it possible to install Windows 7 from one image of Windows 7 Ultimate: Starter; Home; Professional or Ultimate). I hope to sort this out in future articles. He covered all the nuances. Let's run to create a multiboot flash drive.
Article structure
1. Download and install MultiBoot USB
Let's download the MultiBoot USB program with which we will make a multiboot flash drive.
Download conveniently from torrent
http://rutracker.org/forum/viewtopic.php?t=3848726
After downloading, it is advisable to check the checksums

The checksums have agreed, we proceed to the installation.
Run as administrator

Click OK


The installed program starts immediately

Half the battle is done.
2. Download and install UltraISO
You don’t have to do this step if you already have a program installed for working with ISO images (for example). We need a program to mount images into a virtual disk to burn Windows to a USB flash drive.
Download UltraISO from the official website and with the desired language
http://www.ezbsystems.com/ultraiso/download.htm

Launch the downloaded file. In the system warning window, click Launch

We are greeted by the UltraISO installation wizard. Click Next >


Click Install

Click Complete

UltraISO launches. Click Trial period...

UltraISO installed and running

3. Format and install the bootloader on the flash drive
Go down the page in the Download section and download the ISO image in the archive

Downloaded archive

Rename the image to memtest86_5_01.iso and copy it to a folder boot on a multiboot flash drive

Now let's fix the menu_u.lst file
To do this, copy the piece of code responsible for launching Elcomsoft System Recovery Pro v3.0
find -set-root /boot/Elcomsoft.ISO
map -mem /boot/Elcomsoft.ISO (hd32)
chainloader (hd32)
and insert below the item that runs the old RAM test. In the picture below you can see what I came up with

Change the title and image names to memtest86_5_01.iso

We remove the piece of code that runs the old test. Press Ctrl+S and test what we got

Everything is working.
Conclusion
We have created a multiboot flash drive with which you can install , or . It also includes a bunch of useful programs that can be launched directly from a flash drive, two mini systems Windows 7 and Windows XP (you can boot into them and copy data from the system disk before installing the system) and almost full-fledged Windows XP with a huge set of utilities for resuscitating the installed systems and . All that remains is to learn how to use it all.
In the following articles about multiboot flash drives, we will try to do it with antiviruses. To be able to cure a system that does not boot.
16.04.2017
It is quite convenient to keep a USB drive with several OS and programs for working with a computer from the BIOS (Dr. Web, Acronis, Windows 10, Ubuntu, etc.). Most computer technicians carry a device like this with them to quickly analyze a damaged PC or laptop and begin repairing the operating system on the spot. To create a multiboot flash drive it will take about 30-60 minutes and some software.
Creating a multiboot flash drive
Most computer technicians periodically have to work with Linux, Acronis, Kaspersky, Dr. Web, etc. software via boot drive. It is inconvenient to buy a dozen flash drives for such purposes. It is much more practical to install all the software on one multiboot drive and use it while repairing your PC.
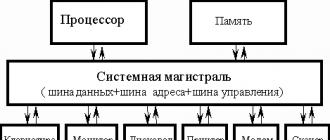
To create such a device, the user will need to install some programs. The task of the software is to copy the boot loader (Grub4dos or Syslinux) to the storage device, mount the ISO image into the desired folder and enter the necessary paths to the files in the menu.
Method 1: WinSetupFromUSB
The most popular software for creating a multiboot drive is WinSetupFromUSB. This utility has a simple interface and allows you to write not only third-party operating systems, but also ISO images of programs to the drive.
After downloading, you need to unpack the archive:
- Run the .EXE file.
- In the window that appears, click on the button «…» .
- Select the installation folder and click "OK".
- Click "Extract".

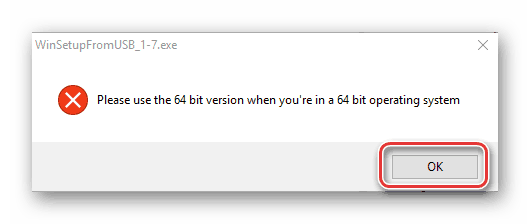
Next, go to the previously designated folder, it will contain two applications of 32 and 64 bit versions. Select the one that matches the processor size of the device you are using. Run first "WinSetupFromUSB_1-7_x64". The file name may differ depending on the software version. If you opened the wrong version of the program, a warning window will appear.
To create a multiboot drive, you must follow the instructions:


More details about menu items:
- Windows 2000/XP/2003 Setup – used to record older versions of Windows.
- Windows Vista/7/8/Server 2008/2012 – used to record modern versions of Windows OS.
- UBCD4Win/WinBuilder/Windows FLPC/Bart PE – partition created for recording bootable disks under WInPE (Windows Preinstallation Environment, loaded into RAM). Used among specialists, WinPE allows you to boot Windows and use the OS in Live mode without installing it to disk.
- LinuxISO/Other Grub4dos compatible ISO - created for recording Linux systems, as well as program images. For example, through this section you can install Dr. Web, Victoria, Kaspersky Rescue Disk, Ubuntu, Kali linux and other software.
- SysLinux bootsector – used for Linux systems with pre-installed Syslinux bootloaders. As a rule, it is used by specialists to test various versions of Linux.
After burning the first ISO file, you can begin installing other OSes and utilities. For this purpose, the instructions remain almost unchanged. Except you don't have to do any formatting.
For example, let's install Kali Linux as the second OS. For this:

If you wish, you can not install the files separately, but immediately select several images for installation at the first stage. Also, if desired, you can open additional settings for formatting, system boot, menu interface, etc. There is no particular need to change the parameters.
Please note that when working through WinSetupFromUSB, problems may arise when recording Windows 7, 8 and 10 versions simultaneously. A similar error was observed on older versions of WinSetupFromUSB.
Method 2: YUMI Multiboot USB Creator
This program has a simple and intuitive interface. A distinctive feature from WinSetupFromUSB is a more detailed classification of programs when recording. This allows you to create a bootloader with additional auxiliary settings at startup.
After downloading, run the utility. To create a multiboot drive you need to follow a few simple steps:
- In chapter "Step 1" select the desired device.
- IN "Step 2". Choose what type of system you will be installing. The drop-down list contains many different names; select the program you need from among them. If you don’t want to select a specific utility, then at the end of the list, find the item "Try an Unlisted ISO". In this case, the image will launch without additional boot settings.
- Select the system image you want to capture. For this purpose in "Step 3" click the button "Browse" and in the window that appears "Conductor" find the required ISO file.
- If you are using the drive for the first time, it is recommended that you format it first. To do this, you can use standard Windows tools or check the box "FAT32 Format". This section may not be present in the utility.
- To begin installation, click "Create". After this, the installation of the image will begin. In this case, archivers will periodically open, as well as Windows windows with information about copying will pop up.

After the software has finished running, you can test the flash drive directly through the computer’s BIOS. Or run the QEMU test in WinSetupFromUSB. The loader interface is minimalistic and distributes the installed software into folders automatically.

Method 3: Xboot
This utility is another type of software for creating multiboot flash drives.
To use XBoot on a PC, you must have the .NET Framework version 4. To create a multiboot flash drive, follow the instructions:


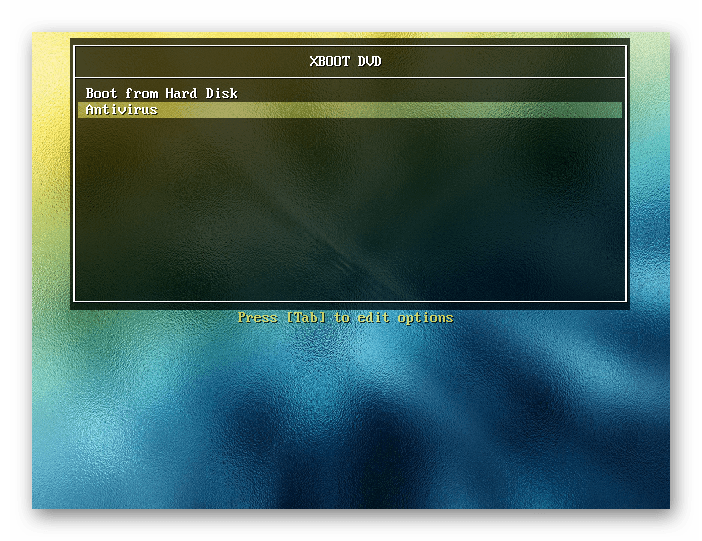
When you launch the created flash drive, a pleasant interface with a beautiful background and an attractive menu appears in front of the user.
Every user can create a multiboot drive. This will require a little time and some software. You can use such a device to repair computers. You need to insert a flash drive with installed utilities into your computer and run the boot loader on the media through the BIOS. After this, you can use all installed software and use them to begin treating or restoring your computer.
And Misha Rytsarev adds: the same bugs have been appearing in this program for a long time. First of all, could this depend on what OS you are running this thing under? (I have "18.04.2"). For example, the bugs I have are that the button to check for updates does not work, even if they exist (and I’ve updated it manually many times already, I haven’t noticed any difference from it, its shortcomings are still not eliminated. Then I take its update packages from here - http://liveusb.info/multisystem/depot/dists/all/main/binary-amd64/m/ and install them manually - installed (and where can you read what bugfixes and other changes (their history) were? ))
And there is another strange bug - often when I try to add an OS to such a multi-boot flash drive, I get the message “Error: the selected ISO image has an unsupported symbol in the name: (3 space) /home/username/Downloads /tails-amd64-3.15.iso" and further below - "Waiting, press ENTER." I click and the program goes into its normal mode. And if, being in it, you try to repeat this operation, then the same thing will happen again. And if you move the required ISO to some other folder (preferably in “Downloads”), sometimes this gets rid of that bug and everything works out. If this does not help, then you have to pervert - insert another flash drive or memory card into the computer and copy this ISO there first and then try to install it using this program into a multiboot flash drive from there - this often helps. And what are these problems?
And one more problem - every time it starts, this program again requires installing the “GRUB-2” boot loader, even if it was previously installed on that flash drive (and why doesn’t it recognize that if it’s not needed there? There really is a button ( uncheck) to disable this function, but for some reason it doesn’t work for me). How can I send my bug reports to the manufacturer? (And is it possible to find an employee there who would remotely (using software like “Anydesk”), hot on his heels, would “tinker” with this program there? (And they haven’t received such complaints before? Do they know about these problems? ))
And well, since this thing is so buggy in life, then what about such a flash drive, what needs to be changed there - do it manually? Those. if it already has one or several different OSes, then how can you manually add another one? (Or if you deleted any of the ISO images available there, then what needs to be edited so that its presence in the menu is not displayed later?) That is. If the user simply copied another ISO there manually, what then needs to be manually changed in the configuration files there so that the new ISO appears in the boot menu and can be launched from it? (And will this program itself be able to do this automatically, if the required ISO has already been manually “uploaded” by the user to such a flash drive? (And how to make changes to everything that is there, even from Windows? (And will this program work normally, if it works in an OS running in a virtual machine?)))
And one more question - how to unmount such a flash drive when any OS is running from it? (This may be necessary in order to write any data to it. After all, everything is written to it differently than to “single-axis” flash drives (i.e., to those on which only one can be written with a regular ISO image burning program, and even in read-only mode - you can’t write or delete anything there with ordinary file managers (even if there is a lot of unallocated space there)).
And if, when you launch an OS in live mode, it turns out that it has updates, then how can you edit this ISO image so as to add these updates to it? (How can I add additional packages and software?))
And one more question about it - how to rebuild the package of this program so that during installation it does not pull anything from the network? (That is, in 1x all those installation packages (at that link above) do not contain everything and they pull a lot more from the network (mostly related to “Qemu” (why is it there? It’s impossible to do without it) ?) And also “Gtkdialog” packages and some other libraries (this is also due to the fact that the original Ubuntu ISO images are too “mentally incomplete” in this regard - they do not contain many hundreds of all kinds of libraries (and something else) without which quite a lot of software cannot be installed offline (for example, only everything related to KDE and QT5 requires about 700 packages!) Mint and other custom builds can get rid of these problems. But not all of them either (and I’ll give for example, the Google Chrome browser packages always have a supply of such “brains” for all occasions; in any OS version and with any shortage of such “brains”, this browser does not pull anything from the network (and there are problems with dependencies I didn’t have it, no matter where I put it, I think that this program can also be improved, “taught”, so that it would be so capable and universal (but I’m afraid that without custom craftsmen it won’t work there))) .